Creating a professional banner to print requires more than just attractive graphics. Whether you're promoting an event, advertising your business, or displaying information at a trade show, the technical specifications behind your design determine whether your final product looks crisp and professional or pixelated and disappointing. Understanding file preparation, material selection, and design principles ensures your banner translates perfectly from screen to physical product, delivering the impact you envision.
Understanding File Requirements for Your Banner to Print
The foundation of any successful banner printing project starts with proper file setup. Your digital file must meet specific technical requirements to ensure the printer can reproduce your design accurately at large dimensions.
Resolution and Image Quality Standards
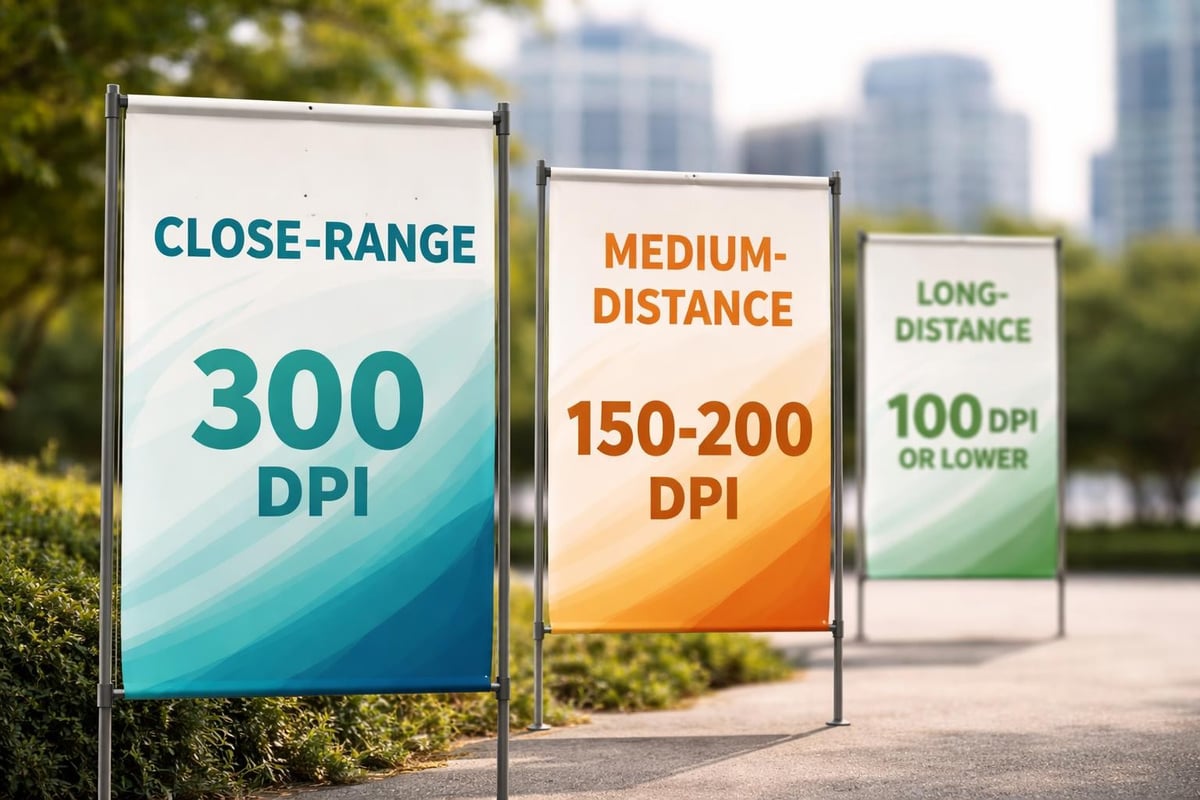
Resolution determines the clarity of your printed banner. For most banner applications, 300 DPI (dots per inch) is the gold standard for high-quality output, though some large-format banners viewed from a distance can use lower resolutions between 150-200 DPI without noticeable quality loss.
When preparing files for large-format printing, consider these resolution guidelines:
- Banners viewed from 3-5 feet: 200-300 DPI minimum
- Banners viewed from 10+ feet: 100-150 DPI acceptable
- Close-up viewing (trade show displays): 300 DPI required
- Billboard-size applications: 50-100 DPI sufficient
The graphic specifications for banner design emphasize that starting with high-resolution images prevents the need to upscale low-quality graphics, which inevitably results in blurry prints.
Color Mode and Profile Settings
Professional banner to print files require CMYK color mode rather than RGB. While RGB colors display beautifully on screens, commercial printers use CMYK inks. Converting RGB files to CMYK can result in unexpected color shifts, particularly with vibrant blues and greens.
| Color Aspect | Requirement | Why It Matters |
|---|---|---|
| Color Mode | CMYK | Matches printer ink system |
| Color Profile | Coated or Uncoated FOGRA39 | Ensures color consistency |
| Black Text | 100% K (not rich black) | Prevents registration issues |
| Rich Black | C:60 M:40 Y:40 K:100 | Deep backgrounds without ink oversaturation |
Setting up your files correctly from the start saves time and prevents costly reprints. The best practices for large format banner printing highlight how proper color management impacts the final product quality.
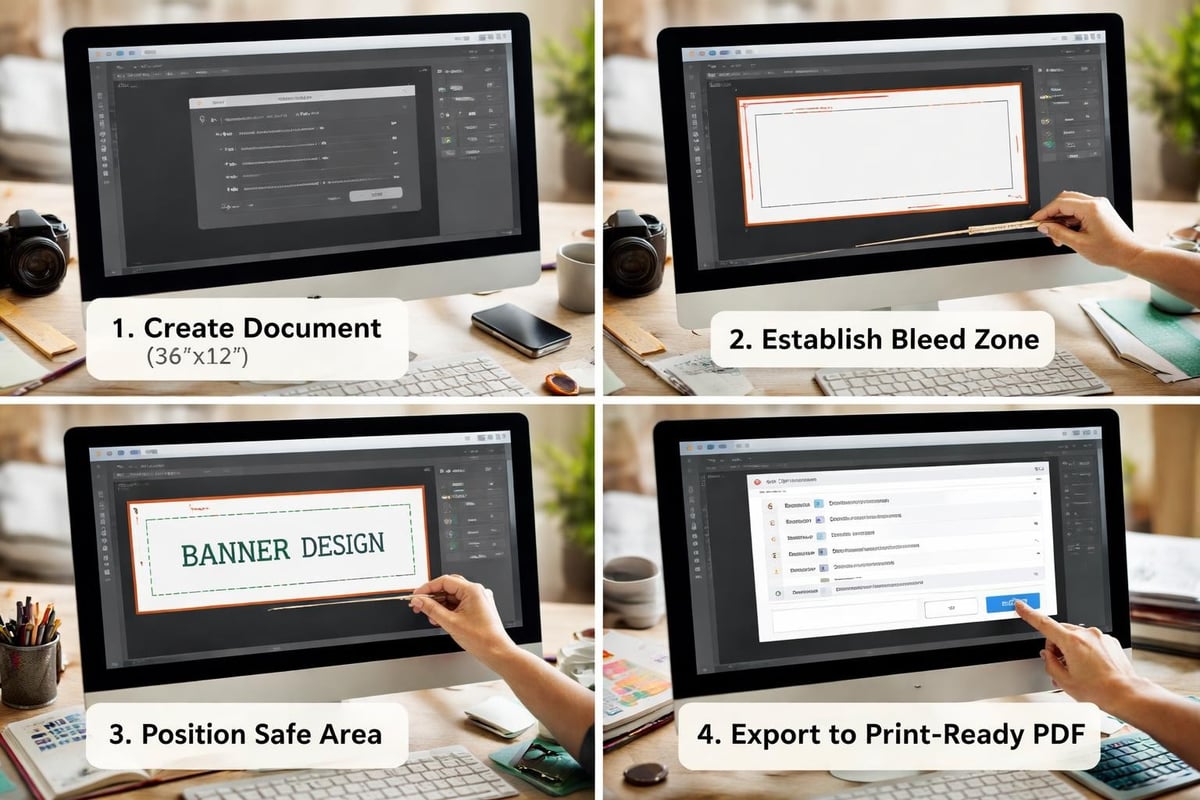
Bleed, Margin, and Safe Zone Specifications
Every banner to print needs proper bleed settings to account for trimming variations during production. Bleed extends your design 2-3 inches beyond the final trim size on all sides, ensuring no white edges appear if cutting isn't perfectly precise.
Establish three key zones in your design:
- Bleed Zone: Extends 2-3 inches beyond trim line; background colors and images continue here
- Trim Zone: The final finished size of your banner
- Safe Zone: 3-4 inches inside the trim line where critical text and logos remain
Position all important elements within the safe zone to prevent accidental trimming. For businesses offering screen printing in New York, understanding these technical specifications ensures every promotional banner meets professional standards.
Choosing the Right Material for Your Banner to Print
Material selection dramatically impacts durability, appearance, and application suitability. Different environments and purposes demand specific banner materials with varying characteristics.
Vinyl Banner Materials
13 oz. vinyl represents the industry standard for outdoor banners. This weight provides excellent durability while remaining cost-effective for most applications. Heavier 18 oz. vinyl suits high-wind areas or long-term installations requiring extra strength.
Vinyl banners offer several advantages:
- Weather resistance for outdoor use
- Vibrant color reproduction
- Tear-resistant construction
- Multiple finishing options (grommets, pole pockets, hemming)
The comparison of banner material types details how vinyl weights affect longevity and application suitability. Understanding these differences helps you select appropriate materials for specific projects.
Mesh and Specialty Materials
Mesh banners feature tiny perforations allowing wind to pass through, reducing stress on mounting hardware. This makes them ideal for fence wraps, building facades, and other applications where wind resistance matters.
| Material Type | Best Applications | Durability | Cost |
|---|---|---|---|
| 13 oz Vinyl | Standard outdoor banners, events | 1-3 years | $$ |
| 18 oz Vinyl | High-wind areas, permanent displays | 3-5 years | $$$ |
| Mesh | Fence wraps, large building displays | 2-4 years | $$$ |
| Fabric | Indoor displays, trade shows | 1-2 years | $$$$ |
| Vinyl/Scrim | Budget outdoor applications | 6-12 months | $ |
Specialty materials like fabric banners provide wrinkle-free displays perfect for trade show booths and indoor presentations. These materials work particularly well with direct-to-garment printing techniques adapted for fabric applications.

Environmental Considerations
Your banner's environment determines optimal material selection. Outdoor banners face UV exposure, temperature fluctuations, rain, and wind. Indoor banners prioritize appearance over weather resistance.
Consider these environmental factors:
- Direct sunlight exposure: UV-resistant inks and lamination extend life
- Coastal or humid climates: Waterproof materials prevent degradation
- High-traffic areas: Durable materials withstand handling and contact
- Temporary vs. permanent: Short-term events allow lighter materials
The outdoor banner material comparison provides detailed insights into how different materials perform under various environmental conditions.
Design Principles That Translate Well to Print
Creating an effective banner to print requires understanding how design elements perform at large scale. What looks perfect on your computer screen may fail when expanded to 10 feet wide.
Typography and Readability
Font selection determines whether viewers can read your banner from the intended distance. Minimum font sizes vary based on viewing distance, but general guidelines recommend:
- Viewed from 10 feet: 1-inch tall letters minimum
- Viewed from 25 feet: 2.5-inch tall letters
- Viewed from 50 feet: 5-inch tall letters
- Viewed from 100 feet: 10-inch tall letters
Sans-serif fonts like Arial, Helvetica, and Futura provide superior readability at large sizes compared to decorative or script fonts. Limit your design to 2-3 font families maximum for visual cohesion.
Color Contrast and Visual Hierarchy
Strong contrast ensures your message remains visible across distances and lighting conditions. Dark text on light backgrounds or light text on dark backgrounds provides maximum readability.
Effective banner designs establish clear visual hierarchy:
- Primary message: Largest, most prominent element (company name or main offer)
- Secondary information: Supporting details in medium size
- Tertiary details: Contact information, dates, or fine print in smallest acceptable size
The design tips for eye-catching banners emphasize creating focal points that draw attention and guide viewers through your message logically.
Image Selection and Optimization
Low-resolution images represent the most common mistake when preparing a banner to print. Never upscale small images to fill large banner areas. Instead, source high-resolution photography or vector graphics that scale infinitely without quality loss.
Professional image requirements include:
- Original camera RAW files or high-quality JPEGs
- Vector logos in AI, EPS, or PDF format
- Minimum 150-300 DPI at final print size
- Proper licensing for commercial use
Consider working with professional photographers or stock image services providing appropriate resolution files. For businesses specializing in custom logo printing trends, vector logos ensure perfect reproduction at any size.
Technical File Setup and Software Considerations
Choosing the right software and properly configuring your files prevents technical issues during production.
Professional Design Software Options
Industry-standard applications provide the precision and features necessary for professional banner to print files:
- Adobe Illustrator: Ideal for vector-based designs, logos, and text-heavy banners
- Adobe Photoshop: Best for photo-intensive designs requiring extensive editing
- Adobe InDesign: Excellent for combining text, images, and complex layouts
- CorelDRAW: Alternative vector software popular in sign industry
Avoid using consumer software like Microsoft Word, PowerPoint, or Publisher for professional banner printing. These programs lack proper color management, bleed controls, and high-resolution output capabilities.
File Format and Delivery Specifications
Printers typically request specific file formats ensuring compatibility with their production systems. Common acceptable formats include:
| File Format | Best For | Considerations |
|---|---|---|
| PDF (PDF/X-1a or PDF/X-4) | Universal submission format | Embed fonts, flatten transparency |
| AI (Adobe Illustrator) | Vector designs | Include linked images, outline fonts |
| EPS | Legacy vector files | Ensure CMYK conversion |
| TIFF | Photo-based designs | Uncompressed, CMYK, proper resolution |
| PSD | Photoshop-native designs | Flatten layers, embed fonts |
The comprehensive guide on setting up files for large banner printing walks through proper export settings for various design applications.
Pre-Flight Checks and Quality Assurance
Before submitting your banner to print, conduct thorough pre-flight checks to catch potential issues:
- Color mode verification: Confirm entire file uses CMYK
- Font handling: Outline all fonts or ensure complete embedding
- Image resolution: Check all placed images meet minimum DPI requirements
- Bleed extension: Verify backgrounds extend fully into bleed area
- Safe zone compliance: Confirm critical elements remain within safe margins
- Spelling and accuracy: Proofread all text carefully
Many print providers offer automated pre-flight checks, but conducting your own review prevents delays and ensures quality. The common mistakes in banner design and printing highlights pitfalls to avoid during file preparation.
Finishing Options and Installation Considerations
How you finish and install your banner to print affects both appearance and functionality.
Hemming and Reinforcement Methods
Hemmed edges provide professional finishing and prevent fraying. Heat-sealed or sewn hems fold banner material back on itself, creating reinforced edges that withstand tension and handling.
Common reinforcement options include:
- Pole pockets: Sewn sleeves at top or sides for pole insertion
- Grommets: Metal eyelets for rope or zip-tie attachment
- Velcro strips: Removable attachment for reusable displays
- Hanging hardware: Integrated mounting systems for specific applications
Reinforced corners receive double-layer material or webbing to prevent tearing at stress points. For larger banners exceeding 100 square feet, wind slits (small cuts allowing wind passage) reduce stress without compromising appearance.
Mounting and Display Solutions
Installation method influences design decisions during banner creation. Permanent installations require weather-resistant materials and secure mounting hardware. Temporary displays prioritize easy setup and portability.
Popular mounting methods include:
- Retractable stands: Self-contained units for trade shows and presentations
- Frame systems: Tension fabric or rigid frames for clean, professional displays
- Wall mounting: Direct attachment using grommets and anchors
- Fence/barrier hanging: Zip-ties or rope through grommets
- Freestanding structures: Weighted bases with pole systems
Understanding your installation environment helps you design banners with appropriate finishing options. Businesses offering custom corrugated plastic signs often provide mounting recommendations based on specific applications.
Testing and Proofing Your Banner Design
Professional print providers offer various proofing options ensuring your banner to print meets expectations before full production.
Digital Proofing Methods
PDF proofs allow you to review your design at actual size (scaled on screen) or in sections. While not color-accurate, digital proofs confirm layout, text accuracy, and positioning. Request both full-size overview and 100% zoom sections showing fine details.
Color-managed digital proofs using calibrated monitors provide better color prediction, though still not perfectly matching final print output due to screen versus ink differences.
Physical Proofing Options
For critical projects, printed proofs on actual banner material offer the most accurate preview. While adding cost and time, physical proofs eliminate surprises by showing exact colors, material texture, and overall appearance.
Consider physical proofs for:
- High-value projects with significant printing costs
- Designs with critical color matching requirements
- First-time designs establishing brand standards
- Banners featuring complex photography or gradients
Many print providers offering custom printed shirts fast extend their quality control processes to banner printing, ensuring consistent results across different product categories.
Revision and Approval Processes
Establish clear approval workflows preventing miscommunication and unauthorized changes. Require written approval on final proofs before production begins, documenting exactly what was approved.
Maintain organized file versions using clear naming conventions:
- BannerName_v1_draft.pdf
- BannerName_v2_revisions.pdf
- BannerName_v3_FINAL.pdf
- BannerName_v3_FINAL_approved_20260317.pdf
Never assume "final" means no more changes will occur. Maintain all versions until production completes, allowing you to reference previous iterations if needed.
Cost Optimization Strategies
Smart planning reduces banner to print costs without sacrificing quality.
Sizing and Quantity Considerations
Standard sizes cost less than custom dimensions due to material efficiency and established production workflows. Common banner sizes like 3×6 feet, 4×8 feet, and 5×10 feet maximize material usage and reduce waste.
Ordering multiple banners simultaneously often qualifies for volume discounts. Even if you need only one banner immediately, consider future needs and order additional quantities if designs remain relevant long-term.
Material Selection Balance
Premium materials justify their cost for long-term installations or high-visibility applications. Budget materials suit short-term events or low-traffic areas. Match material quality to project duration and importance:
- One-day events: Economy vinyl acceptable
- Seasonal displays (3-6 months): Standard 13 oz vinyl recommended
- Semi-permanent (1-2 years): Premium vinyl with UV protection
- Permanent installations: Heavy-duty materials with extended warranties
The practical tips for printing and designing banners include cost-benefit analysis for different material and finishing combinations.
Design Efficiency Techniques
Simple designs with fewer colors reduce production time and costs, particularly for screen-printed banners. Solid colors print more reliably than complex gradients or photographic backgrounds.
Reusable design templates streamline future projects. Create master templates with your branding, standard layouts, and approved color schemes. Update only specific details for new campaigns while maintaining consistent visual identity.
For businesses like those featured in articles about same-day custom shirts, applying similar efficiency principles to banner production ensures quick turnaround without compromising quality.
Quality Control and Production Timeline
Understanding production workflows helps you plan realistic timelines and set appropriate expectations.
Typical Production Schedules
Standard banner to print projects typically require:
- File review and approval: 1-2 business days
- Production and printing: 1-3 business days
- Finishing and quality control: 1 business day
- Shipping: Varies by location and method
Rush services accommodate tighter deadlines at premium pricing. Plan ahead whenever possible, allowing time for revisions and unexpected delays without missing critical deadlines.
Pre-Production Communications
Clearly communicate your requirements upfront:
- Exact dimensions (width x height)
- Material preferences and environmental conditions
- Finishing specifications (grommets, hem, reinforcement)
- Installation method affecting design decisions
- Delivery deadline with buffer for contingencies
Detailed specifications prevent assumptions and misunderstandings that cause delays or unsatisfactory results.
Final Inspection Checklist
Upon receiving your finished banner, inspect it thoroughly before installation:
- Colors match approved proof
- Text accuracy (no typos or missing information)
- Images sharp and properly positioned
- Finishing completed as specified
- Material condition (no tears, scratches, or defects)
- Dimensions match order specifications
Document any issues immediately with photographs, contacting your print provider before installation. Most reputable printers stand behind their work and address legitimate quality concerns promptly.
Preparing a banner to print successfully requires attention to technical specifications, thoughtful material selection, and design principles optimized for large-format printing. By understanding resolution requirements, color management, proper file setup, and finishing options, you ensure your banners deliver professional results that effectively communicate your message. Whether you need promotional banners for events, building signage, or trade show displays, Custom 101 Prints combines technical expertise with fast turnaround times to bring your vision to life. With specialized capabilities in screen printing, embroidery, and direct-to-garment printing, their team provides comprehensive guidance from file preparation through final production, ensuring your banners meet the highest quality standards.